Effective July 13, 2023 - The documentation on this page is made freely available under the Attribution 4.0 International (CC BY 4.0) License.
You are free to use and distribute the documentation as per the terms of the license.
Take me back to the full version
Minecraft Server Version: 1.12.2
Minecraft Forge 1.12.2-14.23.5.2860
Java Version: OpenJDK
Get free hosting credits towards a dedicated server with DigitalOcean by using this link.
Step 1 - Install Java
Step 2 - Verify Java
Step 3 - Setup Your Environment
Step 4 - Download the Forge Installer file
Step 5 - Configure your new Modded Minecraft Server
Step 6 - Optional-- Configure Minecraft to start on bootup
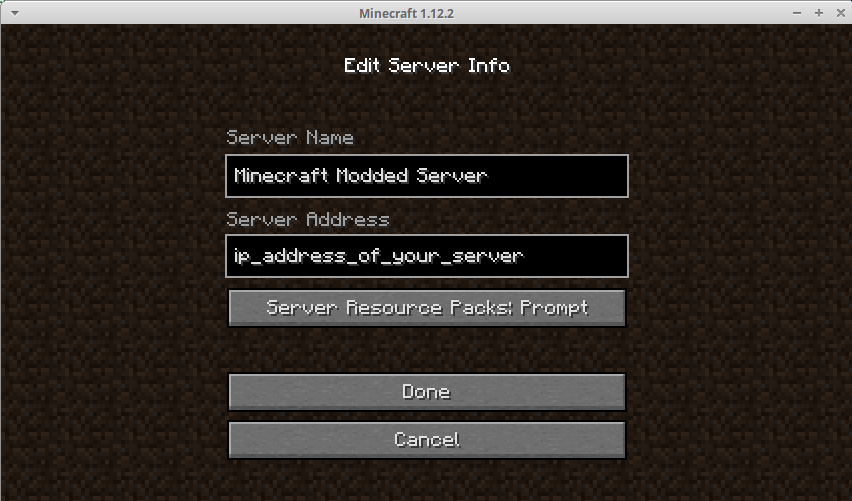
Step 7 - Connect to Your Server
Step 8 - Hardening Your Minecraft Server if Visible on the Internet
Step 9 - Backup Your Server Frequently
Step 10 - Recovering a Corrupted World
Step 11 - Creating Automatic Backups
Donate Your donations keep this site ad free -- Thank You
Report errors in this guide. Your feedback is appreciated.
apt install openjdk-8-jdk
    i) java -version

You should see the following;

    openjdk version "1.8.0_312"
    OpenJDK Runtime Environment (build 1.8.0_312-8u312-b07-0ubuntu1~18.04-b07)
    OpenJDK 64-Bit Server VM (build 25.312-b07, mixed mode)
apt update && apt -y upgrade
b) Install screen (This will be needed to run your minecraft server console while logged out of your Linux server).
apt install screen
    cd /opt
    mkdir minecraft
    cd minecraft
Now download the version 1.12.2 Forge Installer. Pick the Latest Installer file (not the Universal file) and copy it to your /opt/minecraft folder.
You should now have only one jar file in your /opt/minecraft folder.
java -jar forge-1.12.2-14.23.5.2860-installer.jar --installServer
Now run the newly created forge jar file as follows;
    assuming a server with 2048MB (2GB RAM)
    cd /opt/minecraft && java -Xms1024M -Xmx2000M -jar /opt/minecraft/forge-1.12.2-14.23.5.2860.jar nogui
b) accept the EULA. The first time you try to run your minecraft server you will be required to accept the EULA.
nano eula.txt
c) Change the following line to true and save the file
eula=true
d) copy your mods to the newly created mods folder.
e) Run the server again to generate your world. World generation will take a little longer the first time. Subsequent server starts
will be much quicker.
Before doing this, you can download the following server.properties file and replace
the one that was created automatically. (or copy/paste directly to your existing server.properties file from the console).
This server.properties file will give you a standard survival world on normal difficulty.
Edit the file with your preferred seed if you have one and it will generate the world that you specify.
    nano server.properties

    change the following line with your preferred seed directly after the = sign
    level-seed=

    If you leave it blank Minecraft will generate a random world on first launch
f) make things a little easier on yourself by using a script to start minecraft
    cd /opt && mkdir scripts
    cd scripts
    nano minecraft.sh
g) Copy and paste the following in your minecraft.sh file
    #!/bin/bash
    cd /opt/minecraft/ && java -Xms1024M -Xmx2000M -jar /opt/minecraft/forge-1.12.2-14.23.5.2860.jar nogui
h) Save the file and make it executable
chmod +x minecraft.sh
i) Start your server
    screen <---hit enter at the informational message
    /opt/scripts/minecraft.sh

    To exit the screen session hit 'CTRL AD'
nano /etc/rc.local
Right before the last line 'exit 0' add the following command, save and exit the file. This will allow the minecraft server to start in a
detached screen session when the server boots up.
screen -dm -S minecraft /opt/scripts/minecraft.sh
cd /etc
nano rc.local
in the rc.local file copy and paste the following
#!/bin/sh
screen -dm -S minecraft /opt/scripts/minecraft.sh
exit 0
Save the file and make it executable
chmod +x rc.local
If that doesn't work you may have to re-enable the rc.local service. Use the following set of instructions. However this should not be necessary.
Also note that I have not tested this on Ubuntu 20.04LTS but you should be able to re-enable rc.local there as well.
    screen -r minecraft

    To exit the screen session use the following command
    CTRL AD
d) Enter your world for the first time and have fun!!!
b) Activate whitelisting. It is extremely important to activate whitelisting if your server is visible on the internet.
In your server.properties set the following value to true;
    white-list=true

Restart your minecraft server and run the following command at the console for each user you would like to allow.

    whitelist add minecraft_user1
    whitelist add minecraft_user2

To remove a user

    whitelist remove minecraft_user2
    login to your server
    cd /opt
    tar -zcvf minecraft_backup.tar.gz minecraft
Delete your existing minecraft folder

    cd /opt
    rm -r -f minecraft

copy your previously saved minecraft.tar.gz file to your /opt folder.

restore your world

    tar -zxvf minecraft.tar.gz
That's it, restart your server and you have successfully restored from your last good backup.
Any changes you made since that backup are gone, so it is important to do your backups regularly.
This will create a 7 day rotation of backups with the oldest being overwritten with a new one.
a) Create your script.
    cd /opt/scripts
    nano mcbackup.sh
b) copy and paste this script into your mcbackup.sh file you have open in the
nano editor. Change the dest= line to point to the folder you want your backups to reside in.
#!/bin/sh
####################################
#
# Backup minecraft world to a
# specified folder.
#
####################################

# What to backup.  Name of minecraft folder in /opt
backup_files="minecraft"

# Specify which directory to backup to.
# Make sure you have enough space to hold 7 days of backups. This
# can be on the server itself, to an external hard drive or mounted network share.
# Warning: minecraft worlds can get fairly large so choose your backup destination accordingly.
dest="/home/username/minecraftbackups"

# Create backup archive filename.
day=$(date +%A)
archive_file="$day-$backup_files-.tar.gz"

# Backup the files using tar.
cd /opt && tar zcvf $dest/$archive_file $backup_files
c) Save the file by pressing CTRL-X and entering Y
d) Make the file executable
chmod +x mcbackup.sh
e) Test your script. Before creating the scheduled task ensure your script
works
/opt/scripts/mcbackup.sh
f) Create a scheduled task with the cron scheduler
Make sure you are logged in as root so that it writes to your root user crontab.
crontab -e
Enter this line at the end of your root crontab and then save it.
02 2 * * * /opt/scripts/mcbackup.sh &> /dev/null
This will create your backup every day at 2:02 am.
Monday-mcbackup-.tar.gz
Tuesday-mcbackup-.tar.gz
Wednesday-mcbackup-.tar.gz
Thursday-mcbackup-.tar.gz
Friday-mcbackup-.tar.gz
Saturday-mcbackup-.tar.gz
Sunday-mcbackup-.tar.gz
Every day your oldest file will be replaced with the new backup giving you a seven day rotation of backups.
PayPal